Introduction
As this is my first post, I figured, why not write about how I set this very thing up to begin with?
So that’s exactly what I did; in the next few paragraphs you will get a step-by-step process of how you can build this too.
Prerequisites
- GitHub account
- hugo extended edition
- Cloudflare account
- Git
- A domain managed in Cloudflare
Note, a GitLab or Bitbucket account should also work but that’s out-of-scope.
Setting up the local environment
To set up the local environment we must perform the following steps:
- Create a hugo directory (initialize as git repository)
- We use the yaml format for configuration because that’s more readable when compared to TOML (in my opinion)
- Clone the theme used as a submodule into the project
In other words, we need to execute the following commands:
hugo new site me.vincentbockaert.xyz --format yaml
cd me.vincentbockaert.xyz
git init
git submodule add --depth=1 https://github.com/adityatelange/hugo-PaperMod.git themes/PaperMod
Now with that out of the way we can verify that our site works by modifying the hugo.yaml file adding the following:
baseURL: https://vincentbockaert.xyz/ # replace with your baseUrl, can be fake for now
languageCode: en-us
title: It's-a Me, Vinnie!
theme: "PaperMod"
params:
  defaultTheme: auto

  homeInfoParams:
    Title: Welcome to my personal little corner on the internet :)
    Content: Here you can find links to my "socials" as well as posts about hobby-activities, DevOps or otherwise related.
The above will ensure that a home-page is served by hugo, thus we can now make hugo serve our “website”.
hugo server -D # -D is for draft mode, which will reload the pages as we make edits
Setting up deployment
The deployment of your hugo generated static site is extremely straight forward to configure. First off we need to ensure that our repository exists in GitHub.
This shouldn’t need to be explained :D but as an example, we can use the below to create a remote for our local repo:
git remote add origin https://github.com/<your-gh-username>/<repository-name>
git branch -M main
git push -u origin main
Afterward, we can continue with the configuration in the cloudflare dashboard.
Cloudflare configuration
To deploy our site as a Cloudflare Pages application we need to undertake the following procedure:
- Sign in to the Cloudflare dashboard
- Using the webui, starting from Account Home go to Workers & Pages
- Now proceed by selecting Workers & Pages > Create application > Pages > Connect to Git
- Select the created repository (you will first need to authenticate with GitHub to grant Cloudflare access)
- Configuration options to set:
- Production branch: your main branch
- Build command:
hugo --minify- Ensures full canonical URLs will still work after deployment, see more on the subject here
- Build directory: public
Once the first deployment has finished, we will get a unique *.pages.dev domain assigned to our application.
For every commit made to the main branch of our repository, a new build and deployment will take place.
Additionally, pull requests (PRs) can be used to view preview deployments in order to view the changes “live” (without impacting) the main-branch’s deployed version.
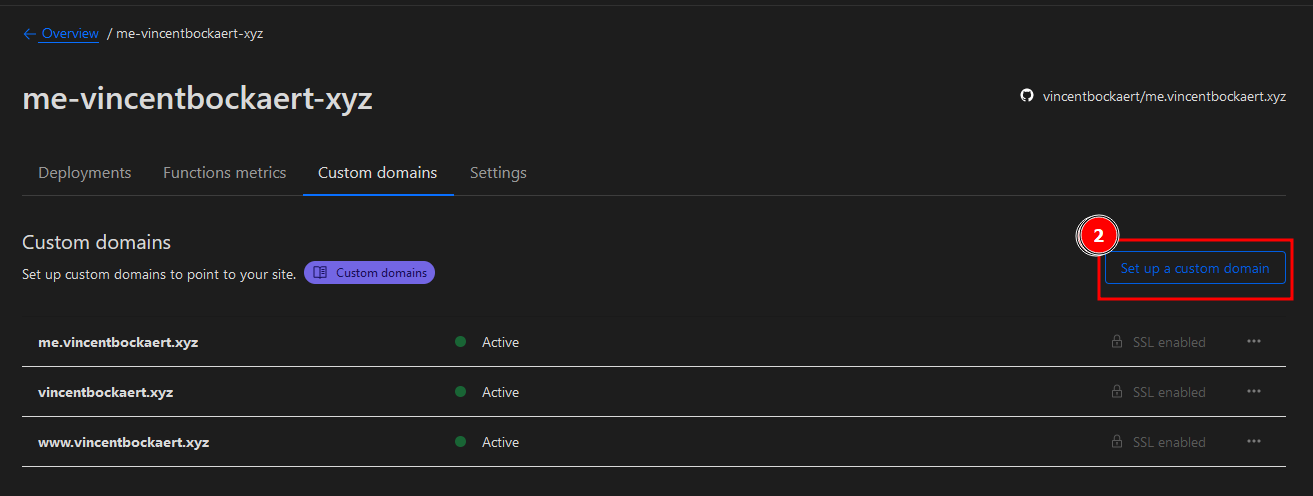
Configure custom domain
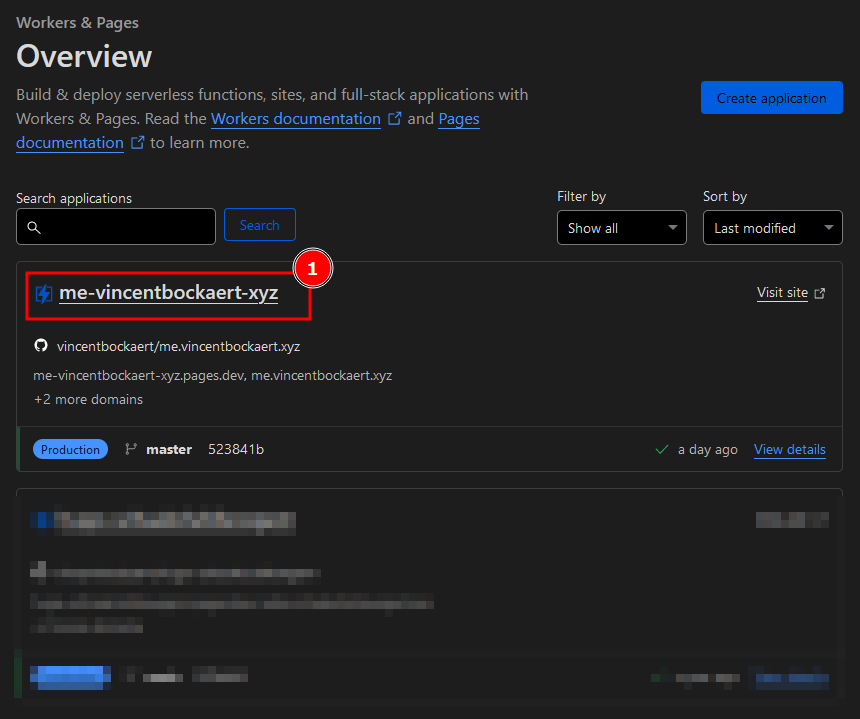
Of course, this isn’t using our fancy personalized domain, so as the final configuration change we rectify this. On the Workers & Pages overview page, we can our deployed Page app.
Using the title of our deployed Pages app we can configure some extra details, among them the custom domains.
See as guidance the below images, with first an overview of my deployed app
…and finally another image which shows where to add a custom domain